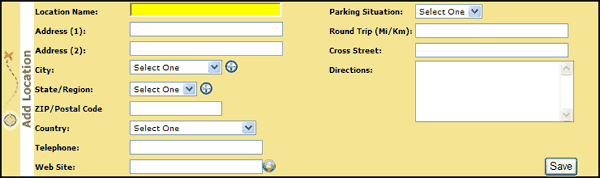
'Add Location' Area


|
'Add Location' Area |
|
|
When you are ready to Add a new Location then enter the appropriate information in the 'Add Location' Area.
You will notice several field boxes for you to enter information in.
Click on any link below to learn more about each field box:
_______________________________________________________________________
Start by assigning a Location Name to the Location.
_______________________________________________________________________
Yup, this is a field box to place the first line of the address.
_______________________________________________________________________
You guessed it...this is a field box to place the second line of the address.
_______________________________________________________________________
The City drop down menu will memorize the Cities you enter. This will make for faster logging of Addresses in the future!
ADD BUTTON
_______________________________________________________________________
The State/Region drop down menu will memorize the States/Regions you enter. This will make for faster logging of Addresses in the future!
ADD BUTTON
_______________________________________________________________________
Where ever the place may be - be sure to enter the Zip/Postal Code!
_______________________________________________________________________
Select the proper Country from the drop down menu.
_______________________________________________________________________
Enter the primary Phone Number for this Location. The Phone Number you enter could definitely come in handy in case you find yourself running late and need to call the Location to let them know you are on your way.
_______________________________________________________________________
If the Location has a Web Site enter it in the field box.
WEB LINK BUTTON
_______________________________________________________________________
If you are unfamiliar with the appointment's Location make sure you ask what the Parking Situation is like there.
Nothing is worse then arriving to your appointment and realizing that you don't have any change for the Parking Meter! The Parking Situation drop down menu will help remind you if you need money on hand when you make future trips to this same Location.
_______________________________________________________________________
You may want to take note and jot down how many miles/kilometers the Round Trip is to this Location from your Default Address (see Top Toolbar > My Account > Preference > Mapping). This is helpful to refer to when entering Mileage (Mi/Km) into your Expenses section.
_______________________________________________________________________
This street...intersects that street. This avenue...crosses that avenue This boulevard...connects to that boulevard. Whatever the case may be, having a Cross Street can prove valuable when getting lost and trying to get your bearings straight!
_______________________________________________________________________
Here are a few different ways you can enter the Directions:
|